Posts: 1,074
Threads: 9
Joined: Jan 2012
Reputation:
53
Hey guys!
I'd like to invite you to share less commonly shared photoshop tricks and techniques.
You know that one thing you always do but you never see mentioned on tutorials? That thing.
Please keep the thread clean and post ONLY straight instructions and what it's for!
I'll start:
Photoshop performance tips:
Scratch disk management: go to Edit > Preferences > Scratch Disks
This next window will list all the disks on your system.
Check the disk you want to use as scratch other than the system disk. A minimum of 20gb available is recommended;
Uncheck the disk where the system is installed (usually C: in Windows).
This will reduce the disk access conflicts with the OS, and your big operations will turn more responsive.
Using Photoshop on systems with low memory RAM or extra heavy files:
Working with a lot of big images at once? Working on a image so big your system has loading bars for everything?
Couple of tricks will help your system go through the ordeal:
Go to Edit > Preferences > Performance and lower history states count. 10 is very light on the system; But beware you're will have this much fewer undo levels/history states.
Every time you do a image wide operation, like flipping a canvas, you can go to Edit > Purge > All (or whatever you deem adequate). Purging all WILL CLEAR YOUR UNDO HISTORY (This means you will be unable to undo anything before this operation) but it will also free all your ram and clean the files on the disk. Doing this every so often gives your system breathing room, and sometimes it is the difference between a system crashing and a workable environment.
Specific things can be purged, like your clipboard memory. Just beware that whatever is purged is, you know, really gone.
Posts: 1,527
Threads: 24
Joined: Dec 2012
Reputation:
70
+++++++rep Sula, goddamn
I wish I could give ya a hug too!
*e-hugsssssssss* <3
I think I know some, will have to take note when I use them and then return.
sketchbook | pg 52
"Not a single thing in this world isn't in the process of becoming something else."
I'll be back - it's an odyssey, after all
Posts: 2,817
Threads: 15
Joined: Jun 2013
Reputation:
109
oooh uuuh, i think i know some, i work in painter sooo... might be alittle different but not too much.
First of all don't use a blur tool for soft edges alot, you can achieve the same effect by taking a soft or hard brush and simply flicking the edge to make it soft, lasso tool to make it insanely sharp.
Try to use color balance/correct whenever you introduce a new layer and play around with it to try to find a more harmonious color before committing it.
For an easy way to add more realistic form and contrast, create a multiply layer or a lower opacity normal layer and fill it with a dark color over the area, then erase it out. verehin demonstrates this:
https://www.youtube.com/watch?v=97C5HPw5Cdk
hard brushstrokes just work alot better than airbrushey stuff, even though airbrush is more forgiving.
constantly move that color wheel to different hues, with every new stoke.
Annddd try to avoid overlay layers at all costs unless you're doing fire or magic or something!
Posts: 149
Threads: 7
Joined: Mar 2015
Reputation:
7
- Make use of actions, if you haven't done so already. They can save you a lot of time.
That's the only thing that comes on top of my head for now.
Posts: 1,074
Threads: 9
Joined: Jan 2012
Reputation:
53
Good Photoshop Habit:
Have you ever flattened an image and then was betrayed by ctrl+s? Downsized a file just to have it overwritten while you haven't been paying attention?
Here is a solution to your problems!
I have created the habit of never using the flatten or resize down command before duplicating my image. It's as simple as
Image > Duplicate
This will create a new file where, if you accidently press ctrl+S, will prompt you where to save the new file. It works both ways - if you save your original file flattened by accident, you still have a copy with all layers and resolution intact.
Remember to duplicate before flattening! Saved me more times than I could count.
Posts: 35
Threads: 0
Joined: Oct 2014
Reputation:
2
(06-27-2015, 05:16 PM)Ursula Dorada Wrote: Good Photoshop Habit:
Have you ever flattened an image and then was betrayed by ctrl+s? Downsized a file just to have it overwritten while you haven't been paying attention?
Here is a solution to your problems!
I have created the habit of never using the flatten or resize down command before duplicating my image. It's as simple as
Image > Duplicate
This will create a new file where, if you accidently press ctrl+S, will prompt you where to save the new file. It works both ways - if you save your original file flattened by accident, you still have a copy with all layers and resolution intact.
Remember to duplicate before flattening! Saved me more times than I could count.
There's also the History tool snapshot feature which lets you save the version your previous version and you can recover it at anytime during the work session, although I prefer your method of creating a new image (which I just save as when scaling or flattening) this can help in a number of ways as well.
Posts: 1,074
Threads: 9
Joined: Jan 2012
Reputation:
53
(06-27-2015, 08:55 PM)Mylqin Wrote: There's also the History tool snapshot feature which lets you save the version your previous version and you can recover it at anytime during the work session, although I prefer your method of creating a new image (which I just save as when scaling or flattening) this can help in a number of ways as well.
The usual problematic workflow:
- You finish an image
- You flatten and resize it
- You save the jpg file using a save as command, creating a secondary file
- You hit ctrl+S out of habit
- You close the file.
The save as command DOES NOT associate the work file with the new file you just created, so you have just overwritten your original file with a smaller and flat version of the image. And your snapshot was lost because you closed the file because you were done with it.
Bam, damage done.
Here is where the duplicate file comes in handy; Since you never flattened the original file, if you saved it, no problem;
If you happen to have taken the steps described above, you still have an untouched file so you can restore your original file no problem.
The snapshot is handy, but it's lost if you close the file.
If you close the file using the duplicate command, you still have the second instance of the file to save ya.
Hence why I advocate its use.
Posts: 2,817
Threads: 15
Joined: Jun 2013
Reputation:
109
THE REASON i advocate avoiding the overlay layer at all costs, is because of one day on my journey i was reading algenplegers sketchbook when he was about 4 or five months in and did a CHOW of a lizard and said something i never forgot. It was like, "I hate how all my work has this dodge burn overlay look to it."
Sooo i kept that in mind in my very early days as i was using overlay as a substitute to understanding lighting and temperature. Obviously if you're more experienced you can handle this layer mode, but beginners abuse it because it gives instant gratification; which is fine, but i think you can learn quicker and just learn to paint contrast manually.
I just find that when i use overlay as opposed to say a soft light layer to add contrast, i get a really washed out look and the colors really flatten and get dirty or end up as nothing special, which is tough to explain... Same with using the dodge and burn tool, they may add contrast but they kill the color harmony; unless you're like rigney and really know how to use them in combination with other layer modes.
Posts: 149
Threads: 7
Joined: Mar 2015
Reputation:
7
Want to make photoshop feel as if you're drawing traditionally rotating your paper? Make use of the rotation tool! Seriously, it totally changed my view of digital a week ago, after I started using it more often.
Posts: 1,074
Threads: 9
Joined: Jan 2012
Reputation:
53
Three more for today:
- You can use other tools without switching out of the tool your currently using. As it works with R, for the rotate tool, if you hold the R key, rotate the canvas and then let go of the R key, you will automatically be back at the tool you're previously using, like the brush. This also works for all other tools with a shortcut attached, so, the eraser, smudge, dodge, burn... it's handy when you get used to it.
- If you alt+click the eye on a layer on the layer palette, you can toggle between only having this layer visibile or having whatever you had before. Very handy to quickly see what you have on that layer (and if you have painted on the wrong one).
A warning: if you manually switch on or off any other layer, the toggling back ability will be lost.
- About layer groupings:
If you have a stack of grouped layers, the whole thing counts a flat image that is subject to the mode of the first layer ("parent" layer) in the pile.
Say you're making an adjustment in a multiply layer, and you want to test some brushstrokes (or you'd like to erase them). If you do another multiply layer, you will darken the effect and mess up the colors; If you just group them, and have the first layer set to multiply, you can add as many layers and test everything without messing the original layers; The whole thing would just be multiplied once.
![[Image: layerstack.jpg]](https://dl.dropboxusercontent.com/u/1614971/layerstack.jpg)
Posts: 215
Threads: 4
Joined: Apr 2013
Reputation:
3
Name all your layers & folders in Photoshop properly. It will save you some time in the long run when there are 30-40+ layers.
If your file is shared with others then they will love for it.
Posts: 1,074
Threads: 9
Joined: Jan 2012
Reputation:
53
To add to Prabu's: if you're managing to many layers to name them individually, consider folders, and naming the specific folders. A folder containing all your sparks layer will still help you track all of them :)
- Alt clicking the arrow next to the folder icon will close the folder and close all the folders inside them. Alt clicking them again will expand all the folders in the tree.
- If you alt+click the eye icon on the layer palette, you can toggle between making only that layer visible and going back to your previous layer visibility setup.
A warning though: if you make only one layer visible and add another layer, the previous visibility setup will be lost. May not be a problem at all if you have few layers, can be a nightmare if you have too many and you're using layers to, for example, save masks/selections. Keep it in mind :)
Posts: 2,817
Threads: 15
Joined: Jun 2013
Reputation:
109
this hit me today just like... dang..
When blocking in the initial colors of the image, keep in mind the temperature color of the environment.
Say you're painting an overcast scene, the lighting will be a cool color. So block in the sketch entirely with... well whatever you want initially to add color variation. Then when you go to paint an object in the scene, say a cloth, block that in on a gel or multiply layer with a cool color and then gently erase that color out where the light is hitting the planes. It makes it so much easier to get accurate color temperature in a scene.
Then you can apply secondary lights and rim light stuff after, but this gets the temperature closer. Like if you have a red cloth, make sure the underpainting is cool if the environment is cool. Then hit the cloth with the multiply of a rich red or whatever color it would be in daylight or under white light. Then erase out the light where it would hit the plane, and photoshop does the color calibrating for you of how dull that red would be.
Ofcourse you need a good eye for value and temperature and use your color balance, but man is this a cool trick.
Posts: 1,527
Threads: 24
Joined: Dec 2012
Reputation:
70
Just thought of a little something I abuse when having to fix proportion issues in a painting lol.
Learned this back in my first (and last) year of uni, during a digital composite tute.
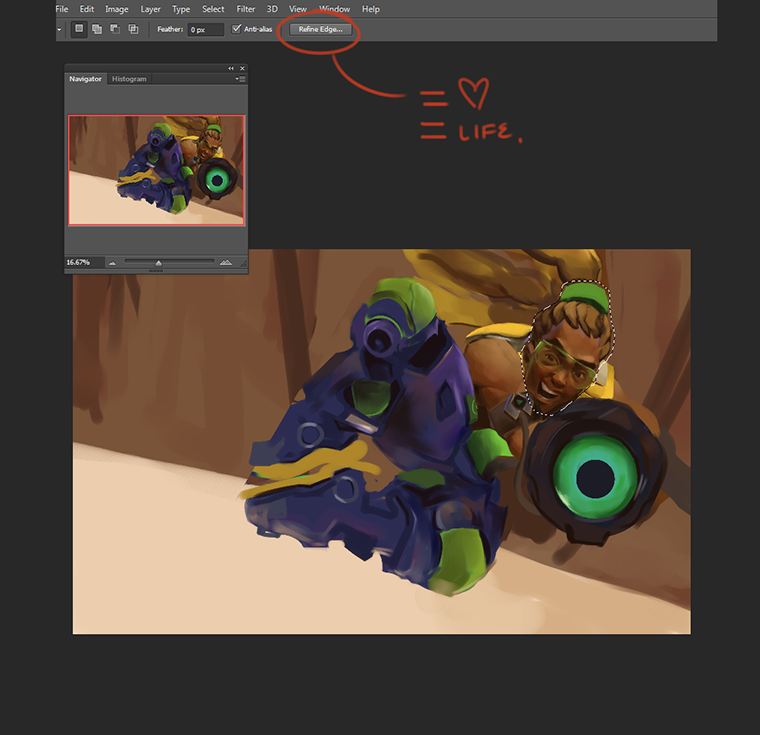
This trick should make duplicated selections a easier to blend when you want to transform them and whatnot in your painting... e.g.:
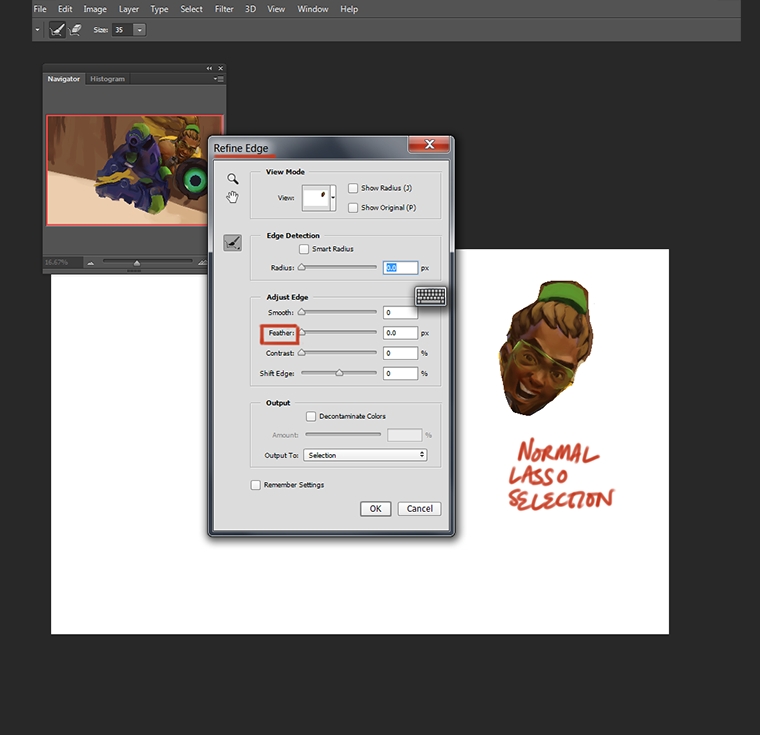
* lasso what you want to transform (resize, etc) - click on "Refine Edges"

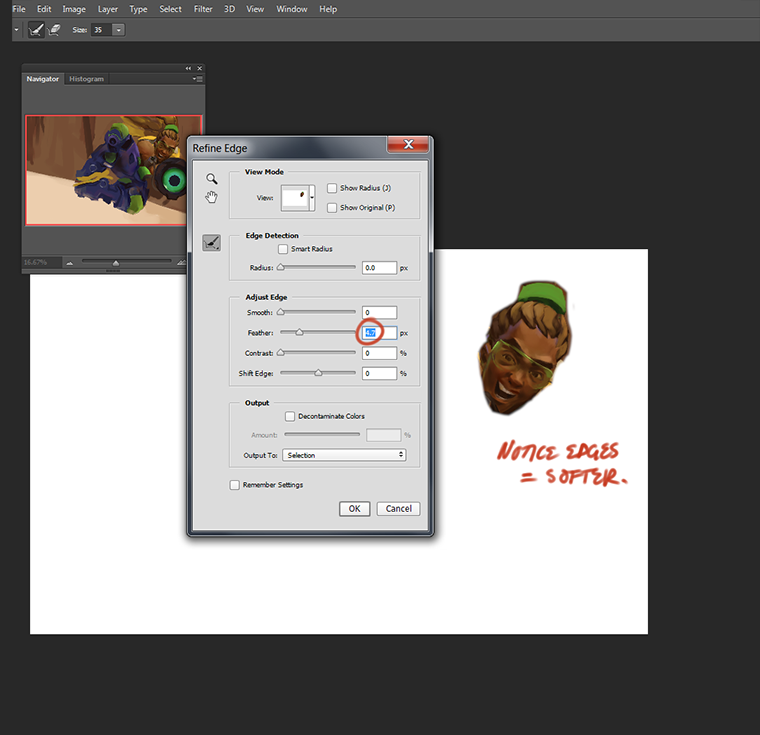
* play around with the feathering option

* to soften the selections edges, thus making fixing parts of your painting less troublesome!

<real talk>
Yes, it's subtle...
but it is effective.
sketchbook | pg 52
"Not a single thing in this world isn't in the process of becoming something else."
I'll be back - it's an odyssey, after all
Posts: 905
Threads: 39
Joined: Sep 2013
Reputation:
51
+Prabu, establish a naming convention to keep layers organized is _very_ important.
eg.
item_fish
item_fruits
contnr_barrels
contnr_baskets
enviro_canvas
enviro_poles
You can assign color to layers by (I think) right clicking the box the Eye icon is sitting on.
eg.
Blue = all things foreground
Green = all things middle ground
Red = all things background
Yellow = sky objects
|


![[Image: layerstack.jpg]](https://dl.dropboxusercontent.com/u/1614971/layerstack.jpg)


