Chromat heap'o art
#1
I still struggle with the basics, pose, proportions, lighting, etc...

Even tho i decided to do some color just to entertain myself a bit.
Source:
https://www.google.hr/search?q=girl+stan...r3XdiuM%3A

[Image: girl.jpg]
Reply
#2
practice random google girls, critique is welcome.
[Image: practice%202.jpg]
hands, damn they are tough

[Image: practice%201.jpg]
Reply
#3
Hey Chromat! Great to see that you posted 2 days consistently!

There's this saying: "When you cast a net too wide, you understand nothing". It looks to me that you're struggling a lot with anatomy. Maybe it would help if you digest the material in smaller pieces. Probably better to be focused on drawing faces and heads for a week. Then the torso. Then the head attached with the torso. And so on.

And yes! I completely agree! Hands are super tough! Granted they are one of the hardest parts to work on. But it's worth working on!

I totally get the feeling of wanting to conquer everything all at once. I started that way as well (and I still catch myself now that I still do!), but focus and understanding really goes a long way!

If you are reading this, I most likely just gave you a crappy crit! What I'm basically trying to say is, don't give up!  
----
IG: @thatpuddinhead
Reply
#4
Thanks a lot!

I am trying to do some characters for  RPG's i am GM so that's why i did figures, and to practice proportions.


So on to the advice i did some heads ( heh heh) with couple of hands where existed.

[Image: heads%201.jpg]

I chose bald people cause it seemed i will get more anatomy that way...
I also saw loomis method tutorial and it seems nice.
Reply
#5
Found some really long tutorial about head and neck. Man this is science!

[Image: practice%203.jpg]
Reply
#6
Hello again! How is the Loomis reading going? Are you reading his 'Figure Drawing for All It's Worth'? Just in case you don't know where to find it, it's here: http://www.alexhays.com/loomis/Loomis%20...20Draw.pdf

Best of all, It's free!

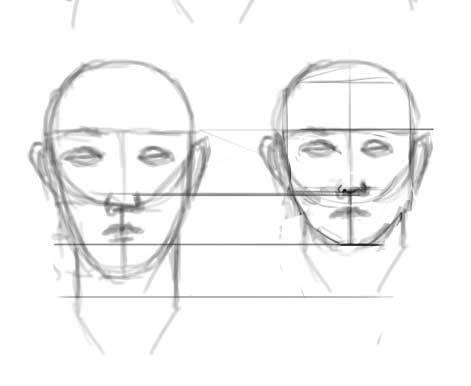
Quick note: be on the lookout for placement and proportion. I hope you don't mind I rearrange the facial features of your drawing?


Here, I played with the sizes and placement of the different elements in your drawing, using your circle as my base!

Keep practicing!

If you are reading this, I most likely just gave you a crappy crit! What I'm basically trying to say is, don't give up!  
----
IG: @thatpuddinhead
Reply
#7
Thank you again for critique. And for the book i didn't have that one.

Some tryouts from tutorial i am watching.

[Image: practice%204.jpg]
Reply
#8
I'm gonna tell you something I wish I did when I was getting that initial complete beginner mileage. My best studies always had a way of checking. Take any face. I'm assuming you're getting these off of pixelovely? Copy the image, and move it into photoshop. Give yourself 2 minutes for the initial lay in. Don't be discouraged if it takes longer than two minutes for your lay in, just do it over again and do not rush the process until you get some lay in that looks correct. Keep in mind that your goal is to get the size of your lay in equal to the size of your photo. Once your lay ins look correct, add a transparent layer and compare the two. You may use red to place in your corrections, or you may mentally note them. Focus on fixing the biggest mistake in your next lay in. Do not be discouraged if this takes multiple attempts to even match the last one, as your last lay in was your best of many. Rinse and repeat until you have a lay in you're satisfied with.

I personally recommend taking an approach similar to Loomis's for the head, as described here by Proko: https://www.youtube.com/watch?v=1EPNYWeEf1U
The reason why is to aid the artist in having a structure to work with from imagination, and your depiction of the forms on top of this guide helps more easily build your visual library.

With your lay in that you're satisfied with, you may either take a fully 2d approach to try to really see the forms as they are, focusing on going from the big forms to the smaller forms or work in a more constructive manner, placing geometrics in perspective according to how they should interlock given the form of the skull. I'd personally recommend the fully 2d approach until you want to start working a lot more from imagination, in which a study of the skull for long term remembrance should become important.

Do not take too long with each drawing, if you see big mistakes after the fact it's generally better to just start over and attempt it again fresh focusing on correcting that mistake rather than trying to correct it on the same image. Oftentimes the mistake may not be what you expected. Loomis describes this a touch in Drawing The Head and Hands in that people may add more chin when the relationship between the end of the nose and the lips are wrong or etc.

Take this all with a grain of salt, as a skeptic. Try some of it out and see what does and doesn't work after an honest effort. Anyone with more expertise reading this please correct anything you feel to be incorrect in this post.
Reply
#9
Yep what Pax said. Focus much more on structure, proportion and perspective of your forms.
I would argue though that while you don't want to belabour every drawing, be slow and accurate over too quick and sketchy. You'll get more from attempting accuracy but doing it repeatedly.

Google for images of the asaro head which will give you a good indication of the basic planes and shapes in the head. Do some studies of them and use them for reference as well.
Also, look up the Reilly method for lay-ins, which is similar to Loomis but I found the rhythms in it to take Loomis a few steps further. A video demonstrating basic but accurate lay in which might be useful
https://www.youtube.com/watch?v=PQ5ZaK1XExE

 YouTube free learnin! | DeviantArt | Old Folio | Insta
Reply
#10
I went through "The new masters academy" 3 hours long free head tutorial (https://www.youtube.com/watch?v=2T7cDY7YDsg). And  did some practice at the end of tut.


Round one
[Image: practice%205.jpg]
round two
[Image: practice%206.jpg]
 
One minute for each, i will probably go once again through tut and couple of times through this practice till i get the feel of it. This tutorial gave me some structure to my learning i needed. I hope there are more like this on other parts of the body.

Than torso round.
Now when i draw i notice i am getting the head better than the rest (and usually screw everything else).

Thanks guys! This is lot of information for me to process. I will try this method pax mentioned.
Reply
#11
Good progress Chromat! Those heads a looking better. Maybe mix in some slower sketches as well so that you can spend time tidying them up. I find it helps me retain the information better when I slow down.

Keep it up dude!

“Today, give a stranger one of your smiles. It might be the only sunshine he sees all day.” -- H. Jackson Brown Jr.

CD Sketchbook


Reply
#12
Thanks loader!
This is third round where i gave myself bit more time to do the things. I will go to next part of anatomy and come back later, i had enough of the heads for now.
[Image: practice%207.jpg]
Reply
#13
Doing a bit of loomis. Damn, I've put grid on bottom layer and still miss the proportions.

[Image: Loomis1.jpg]
Reply


Forum Jump:


Users browsing this thread: 1 Guest(s)