08-24-2014, 10:45 PM
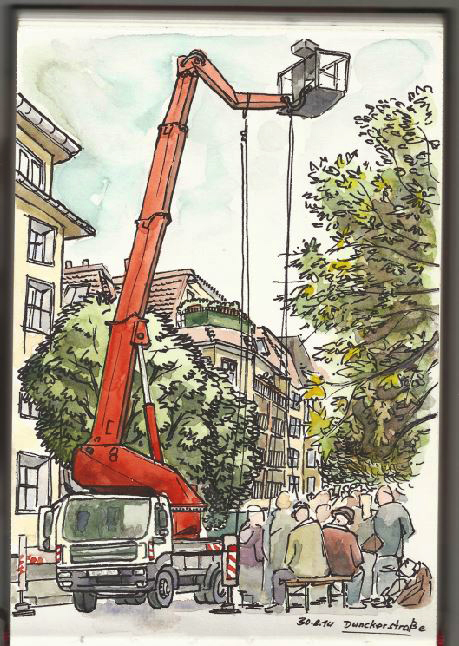
and I brought home some water-color paintings. I feel like I am still a beginner with these and sometimes struggle to find the right color and value. But it was fun nonetheless and I hope I learned something hehe. Some of them aren't finished but to me they work because I just wanted to get some more experience and experiment.
I use a Pentel Waterbrush and Windsor & Newton Watercolors in a Bösner water-color-sketchbook.
Hveragerði

Hveragerði was our first stop. From there we did the Golden Circle tour, saw Geysir (which is in fact a name, not a thing but all other geysirs are named after him) and Strokkur (which is a geysir, that erupts almost every 5 minutes!), the big Gullfoss (a waterfall) and some other beautiful Icelandic scenery.
Skaftafell


The next big stop was Skaftafell at the Vatnajökull national-park. I had some issues to find the right colors and keep the shapes together. Although it is not the most colorful I kinda like the one in middle.
Austurland

The weather wasn't too great here so we didn't stay very long in the Eastfjords. But it was enough for one painting. The Fjords kicked my butt, I just couldn't make it work the way I wanted. But the big stone in the foreground, a bit left from the middle, I quite like. It has some nice bounced light and the values seem more or less correct. Not that it looked like that in reality, though ;(
Vestfirðir

The Westfjords were beautiful and we hat great weather. We actually could get out in short pants and t-shirts.
Látrabjarg

This wasn't painted on site, but after doing some studies and then taking time while staying in Reykjavik. It was fun do work on these and the result is showing the effort. Probably my favorite of the bunch. But still, I am not saying that I am good at water-coloring ;)
the local beer

tasted okay. I tried to paint my red pencil and pocket water-color-set in the can.
on the plane back

just some random woman sleep on the plane.
It was really frustrating doing some of these, others were more fun. All in all I liked the experience and I will keep doing them. At least on the next trip ;)
Hey guys, I did another still-life yesterday and wanted to share the process I used yesterday.
1) establish the rough composition
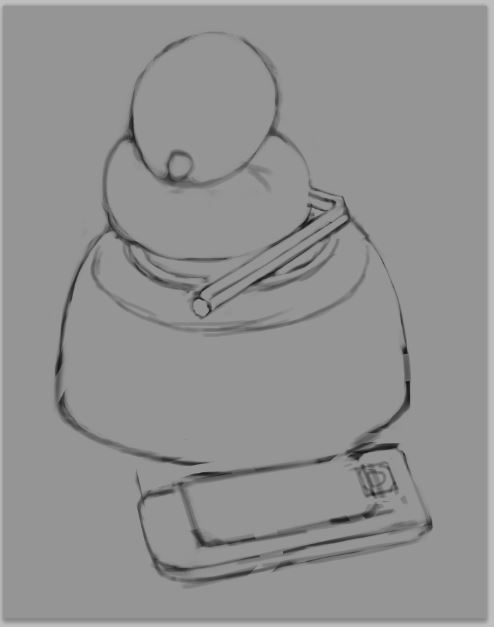
2) Lay down the base color of the objekt. Not the color of the shadow-side or the color in the highlight but something in between.

3) create another layer above your object (i.e. the lemon) and set it to be a "clipping mask". That way you can't paint outside of the pixels of the layer beneath. Now brush in the shadow-shape. The color is not important, you can change that with ctrl+u (or cmd+u for mac) which opens the "Hue and Saturation"-adjustment-menu.

4) now ad another clipping-mask and add reflected light where-ever you see it. Reflected light is where 2 or more objects are so close to each other, that light bounces of one object onto another one. Often these bounced lights have taken on the color of the object they first touched, because it absorbed all the other colors of the light. That way bounced light is often more saturated than direct light.

5) What has changed? Only something small: occlusion shadows. The places where 2 or more objects touch or are really close together, the light has a hard time getting in and out of. At those spots "occlusion shadows" occur and they are often the darkest part in the picture. Brush them in with a soft brush and erase out what you don't need.
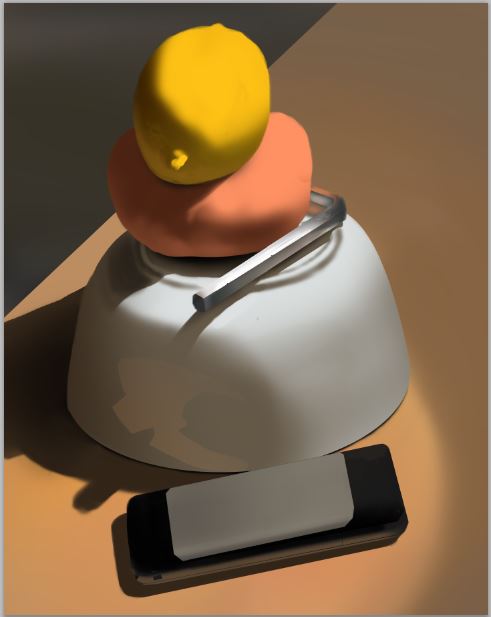
6) Ok, this may seem like a big step, but the foundation is laid and all I do now, is to look more or less carefully and paint in what I see.
I used mostly the soft and hard round brush that comes with PS and 1 or 2 custom brushes by the great and powerful Shaddy Safadi. http://www.shaddyconceptart.com/download

7) Add silly stuff. I hope you have fun trying this process ;)

I use a Pentel Waterbrush and Windsor & Newton Watercolors in a Bösner water-color-sketchbook.
Hveragerði
Hveragerði was our first stop. From there we did the Golden Circle tour, saw Geysir (which is in fact a name, not a thing but all other geysirs are named after him) and Strokkur (which is a geysir, that erupts almost every 5 minutes!), the big Gullfoss (a waterfall) and some other beautiful Icelandic scenery.
Skaftafell
The next big stop was Skaftafell at the Vatnajökull national-park. I had some issues to find the right colors and keep the shapes together. Although it is not the most colorful I kinda like the one in middle.
Austurland
The weather wasn't too great here so we didn't stay very long in the Eastfjords. But it was enough for one painting. The Fjords kicked my butt, I just couldn't make it work the way I wanted. But the big stone in the foreground, a bit left from the middle, I quite like. It has some nice bounced light and the values seem more or less correct. Not that it looked like that in reality, though ;(
Vestfirðir
The Westfjords were beautiful and we hat great weather. We actually could get out in short pants and t-shirts.
Látrabjarg
This wasn't painted on site, but after doing some studies and then taking time while staying in Reykjavik. It was fun do work on these and the result is showing the effort. Probably my favorite of the bunch. But still, I am not saying that I am good at water-coloring ;)
the local beer
tasted okay. I tried to paint my red pencil and pocket water-color-set in the can.
on the plane back
just some random woman sleep on the plane.
It was really frustrating doing some of these, others were more fun. All in all I liked the experience and I will keep doing them. At least on the next trip ;)
Hey guys, I did another still-life yesterday and wanted to share the process I used yesterday.
1) establish the rough composition
2) Lay down the base color of the objekt. Not the color of the shadow-side or the color in the highlight but something in between.
3) create another layer above your object (i.e. the lemon) and set it to be a "clipping mask". That way you can't paint outside of the pixels of the layer beneath. Now brush in the shadow-shape. The color is not important, you can change that with ctrl+u (or cmd+u for mac) which opens the "Hue and Saturation"-adjustment-menu.
4) now ad another clipping-mask and add reflected light where-ever you see it. Reflected light is where 2 or more objects are so close to each other, that light bounces of one object onto another one. Often these bounced lights have taken on the color of the object they first touched, because it absorbed all the other colors of the light. That way bounced light is often more saturated than direct light.
5) What has changed? Only something small: occlusion shadows. The places where 2 or more objects touch or are really close together, the light has a hard time getting in and out of. At those spots "occlusion shadows" occur and they are often the darkest part in the picture. Brush them in with a soft brush and erase out what you don't need.
6) Ok, this may seem like a big step, but the foundation is laid and all I do now, is to look more or less carefully and paint in what I see.
I used mostly the soft and hard round brush that comes with PS and 1 or 2 custom brushes by the great and powerful Shaddy Safadi. http://www.shaddyconceptart.com/download
7) Add silly stuff. I hope you have fun trying this process ;)


